
Great Hammer Tank
Great Hammer Build
The tank is a pivotal role in 5v5 gameplay, it is your job to control the flow of battle, relieve pressure put on your team, and help generate pressure on the opposing team. This build is here to react to, and counter the opposing team’s actions, and to proactively prevent the opposing team’s ability to work together by separating players, interrupting abilities and shutting down damage. This build achieves this through unparalleled displacement. The Great Hammer tank works best with a more aggressive, melee oriented team. With a focus on strong disable, and resistance reduction to put heavy pressure on the opposing team.
There is a key point in that notion of “controlling the fight”. Don’t just rush in and blow all your abilities on the enemy team. Patience is key, wait and watch the battle unfold, and use your spells at key moments to shut down the enemy team. How you do this will come with practice, and with experience on how you can use your spells to their best effect. Work with your team, peel for your healer by helping force back aggressors, shut down enemy casters or healers where you can, and don’t over commit. Stay alive, keep your healer alive, and do your best to move the fight in your favor with the amazing spells listed here in the build. More details on how below.
Iron Breaker: A downwards smash in a small cone in front of you that reduces the resistances of all players hit and does a small amount of damage. This spell can help your team’s damage really hit hard by bypassing some of their defensive stats. Using this ability after a good stun on the enemy team, or simply keeping those players closest to your team weakened allows your teams increased damage to act as a defensive to keep opposing players at bay

Power Geyser: Is a simple defensive/offensive choice. There may be situations where Inertia Ring, or Slowing Charge may be more viable, but in general Power Geyser can be a great option to help look after your team, and interrupt the opposing team. This spell will knock up any enemy players caught within, and push back and allied players, meaning you can use it to help separate your team from aggressive melees pushing in on them, or to knock up and interrupt key channels or spell casts from the enemy team. It is a ranged spell with a short hit delay, so practice landing it and you will be able to get more value out of the spell the more experienced you get with it.
Tackle: Charge forward in a Line, knocking back and stunning all enemies you come into contact with. The stun completely disables all actions from a player other than cleanses such as the mercenary hood. A good stun can turn the tide of battle, allowing your team to score some easy damage, or completely breaking apart the opposing team’s synergy. A great use for this spell is to split up the opposing team’s damage. When you see them trying to work together to focus down a single player on your team, or deal heavy damage to your team as a whole, Tackle can be a great way of shutting down some of it. Remember, you don’t need to stop all the team’s damage, simply stopping some of the players taking part will split up their damage, and throw them out of sync, making it much easier for your team to survive, and especially counter.


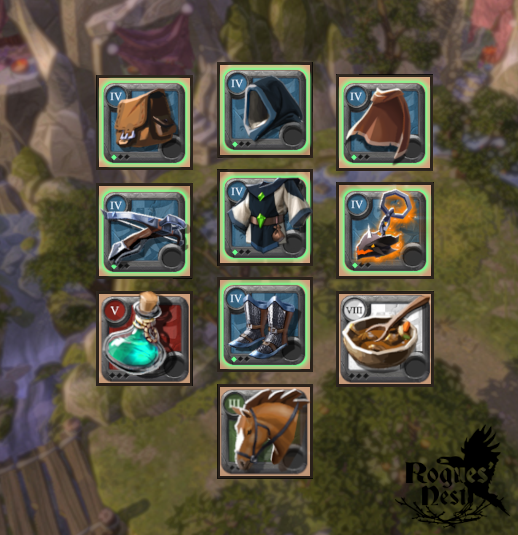
Equipment abilities
Fiend Cowl
The fiend cowl is the main choice to help you deal with Bow’s or other strong damage dealers that rely heavily on their buffs to do damage (such as frost staffs with scholar robes or morgana capes). You can also use this to purge hellion jackets, defensives, or stacks on dangerous melee weapons. Overall though, you may want to stick on the forcefield spell, an instant cast ability that knocks all enemies away from you. Perfect for pushing back aggressive melees to peel for your backline, interrupt key casts, or help isolate enemy team members from their team.
Guardian Armor
A super simple, but very valuable spell. Activating it will put a purple aura around you, that decreases all damage done by anyone in the radius. It will also reveal anyone in invisibility, making it great to counter hellion shoes or assassin jacket damage dealers trying to stack up high damage. Overall however, if you see your team is either taking, or about to take heavy damage, using this armor to reduce the damage the enemy can do to protect your team can put your team on the winning side of the damage exchange. Don’t just use this whenever, save it for when you need it and you will always see its value.
Fiend Sandals
An interesting shoe option, with a spell that allows you to instantly switch places with an ally, or enemy player, interrupting spell casting and also offering you a brief invulnerability frame to dodge damage. This can be used to great effect by either keeping it to cancel a healer’s cast, damage dealer’s channel, or simply helping you isolate an enemy player from their team. Don’t forget however that it can be used on allies, sometimes it may be advantageous for you to switch an ally out of a dangerous situation, putting you in harm's way as the tank and allowing you to instantly control those players that were pushing on your team.
Thetford Cape
Martlock cape is definitely the safer option, but a Thetford Cape just helps with the exchange of damage and increases pressure on the enemy team’s healer. If you don’t feel comfortable with pushing that damage, just take the Martlock to keep you safe, but remember that 5v5 boils down to an exchange of damage dealt, damage taken, healing done, and anti|heal applied. You want something that enables you to have the biggest impact on that equation as possible, and the thetford cape is what does that the best. Alternatively you could use a bridgewatch cape to apply a strong damage reduction on a longer cooldown.
none
Passives
Energetic / Efficiency / Authority on the Weapon, Cloth armor, and Plate armor respectively. This passive selection should enable you to sustainably keep up your energy, with the Authority passive on the chest providing you with a respectable bonus to your stun duration, especially when combined with your food.
Avalonian Beef Sandwich
The hammer stuns can be devastating. Completely disabling players, preventing their ability to deal damage, whilst helping enable your team to deal heavy damage to players unable to defend themselves. This sandwich will increase your CC duration, and add some more health. Something valuable given you are not taking the toughness passive on the chest piece.
Resistance Potion
The resistance potion is an important defensive as a frontliner to ensure you can cover yourself from focus, and buy your healer the time to pick you up. Remember, that there can be cases to use this aggressively, to allow you to push up to the enemy and pressure them, with the increased defense protecting you whilst you do it, possibly buying your team the time they need to recover before returning for heals.
Strengths
- Example 1
- Example 2
- Example 3
Counters
- Example 1
- Example 2