
Heavy Mace Tank
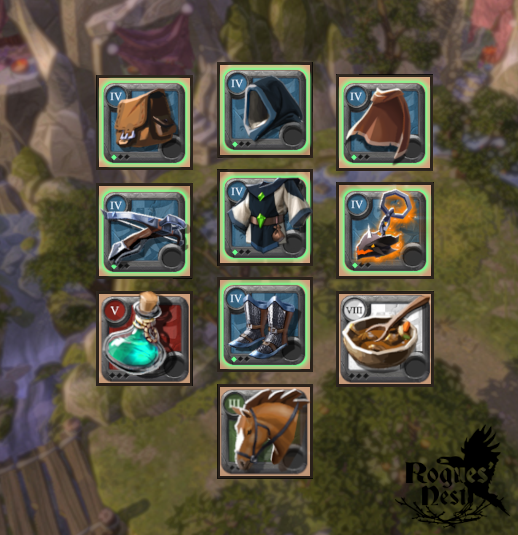
Heavy Mace Build
The tank is a pivotal role in 5v5 gameplay, it is your job to control the flow of battle, relieve pressure put on your team, and help generate pressure on the opposing team. There are some comps where the tank will set up damage for their team, but in most cases this build is here to react to, and counter the opposing team’s actions, and to proactively prevent the opposing team’s ability to work together by separating players, purging abilities and shutting down damage.
There is a key point in that notion of “controlling the fight”. Don’t just rush in and blow all your abilities on the enemy team. Patience is key, wait and watch the battle unfold, and use your spells at key moments to shut down the enemy team. How you do this will come with practice, and with experience on how you can use your spells to their best effect. Work with your team, peel for your healer by helping force back aggressors, shut down enemy casters or healers where you can, and don’t over commit. Stay alive, keep your healer alive, and do your best to move the fight in your favor with the amazing spells listed here in the build. More details on how below.
Sacred Ground: This is a great ability to shut down enemy healers and casters by silencing and slowing anyone in the area. A great way to use this to maximum effect is to combine it with your snare chare, locking down opponents on the sacred ground to completely deny spell casting. When silenced opponents can still use their potions, but will be unable to activate any other spell excluding cleanses. When you snare charge is on cooldown you can still use this ability to drop it on top of casting or channeling players to halt their skill usage and force them to move, buying your team valuable time.

Snare Charge: A jump that will snare all players around you upon landing, whilst also interrupting any spell casting or channels. This can be a great spell to peel for your backline, or aggressively shut down the opposing team’s damage or healing when combining it with sacred ground as detailed above. Another great way to get value out of this skill is to combine it with the forcefield spell on your helmet, snaring opponents before knocking them back with forcefield, perfect for either pushing back opponents and keeping them at bay, or isolating another player by knocking them back and immobilizing them in your teams for damage. Be aware that snare charge can be interrupted or canceled by knockbacks/fears. Be careful not to waste it by jumping into a fire wall.
Battle Howl: The main spell of the heavy mace, and an incredibly useful spell in 5v5, especially in Ranked Crystal Arenas. The spell will cast a purge in the area around you, briefly silencing all players caught in the radius, as well as purging all positive buffs. This makes it great to purge off Hellion Jackets, Sword stacks, Axe aggressive rush, Dagger stacks, or even Healing over Time stacks from a Nature staff. Using this at key moments can turn the tide of battle, defend from damage, or even enable a kill for your team by purging strong defensives such as the Cleric Robe’s Everlasting Spirit immunity.


Equipment abilities
Fiend Cowl
The fiend cowl is the main choice to help you deal with Bow’s or other strong damage dealers that rely heavily on their buffs to do damage (such as frost staffs with scholar robes or morgana capes). You can also use this to purge hellion jackets, defensives, or stacks on dangerous melee weapons. Overall though, you may want to stick on the forcefield spell, an instant cast ability that knocks all enemies away from you. Perfect for pushing back aggressive melees to peel for your backline, interrupt key casts, or help isolate enemy team members from their team.
Guardian Armor
A super simple, but very valuable spell. Activating it will put a purple aura around you, that decreases all damage done by anyone in the radius. It will also reveal anyone in invisibility, making it great to counter hellion shoes or assassin jacket damage dealers trying to stack up high damage. Overall however, if you see your team is either taking, or about to take heavy damage, using this armor to reduce the damage the enemy can do to protect your team can put your team on the winning side of the damage exchange. Don’t just use this whenever, save it for when you need it and you will always see its value.
Fiend Sandals
An interesting shoe option, with a spell that allows you to instantly switch places with an ally, or enemy player, interrupting spell casting and also offering you a brief invulnerability frame to dodge damage. This can be used to great effect by either keeping it to cancel a healer’s cast, damage dealer’s channel, or simply helping you isolate an enemy player from their team. Don’t forget however that it can be used on allies, sometimes it may be advantageous for you to switch an ally out of a dangerous situation, putting you in harm's way as the tank and allowing you to instantly control those players that were pushing on your team.
Thetford Cape
Martlock cape is definitely the safer option, but a Thetford Cape just helps with the exchange of damage and increases pressure on the enemy team’s healer. If you don’t feel comfortable with pushing that damage, just take the Martlock to keep you safe, but remember that 5v5 boils down to an exchange of damage dealt, damage taken, healing done, and anti-heal applied. You want something that enables you to have the biggest impact on that equation as possible, and the thetford cape is what does that the best. Alternatively you could use a bridgewatch cape to apply a strong damage reduction on a longer cooldown.
none
Passives
Energetic / Efficiency / Toughness on the Weapon, Cloth armor, and Plate armor respectively. This passive selection should enable you to sustainably keep up your energy, with the toughness passive on the chest providing you with some much needed defense vs. players.
Avalonian Pork Omelette
Because you are wearing two pieces of cloth, you are missing the two toughness passive defenses you would get from the helmet and shoe slots. This food choice increases your defense vs players, helping you take more damage up in the front, and making it cheaper for the healer to keep you alive. It will also reduce your cooldowns, helping you to keep better control of the fight by having your abilities and spells up more often.
Resistance Potion
The resistance potion is an important defensive as a frontliner to ensure you can cover yourself from focus, and buy your healer the time to pick you up. Remember, that there can be cases to use this aggressively, to allow you to push up to the enemy and pressure them, with the increased defense protecting you whilst you do it, possibly buying your team the time they need to recover before returning for heals.
Strengths
- Amazing low cooldown Purges
- Great control over the fight
- Best counter to Nature Healing
Counters
- Fire wall preventing your Snare Charge
- Not as much value vs Holy Healers