
Holy Healer
Holy Staff Build
The Holy Staff is the true savior option of the holy line, with focus on saving low health allies with strong single target heals. Because of the low cooldowns and stacking healing buffs the Holy Staff offers, it is more mechanically demanding than other holy staffs in the weapon line, so it may take some getting used to, and likely will require practice. But with that practice you will have a very strong healing setup, that you can really customize to your preference. This build is meant to be a starting point to get you going, but don’t be afraid to customize it to suit your preference.
Some examples would be wearing a royal cowl, caerleon cape and instead choosing “Generous Heal” and “Holy Blessing”. This turns you into a fully single target focused healer, with unparalleled single target healing output. The advantage of switching to a setup like this is that it is easier for you target your heals in “pick up groups” (pugs) arenas when solo queueing, without risk of panicking allies running out of something like Holy Flash. Also allowing you to better look after yourself with stronger single target healing. Of course the downside to this is that if you have a melee heavy team and they are clumping for damage, you may get overwhelmed trying to heal all of them.

Holy Flash: This will cast an area of healing down on the ground capable of healing multiple players at once. The biggest enemy of this skill in public areas is likely to be your team running out of them, but a few deaths in most will realize that they should probably stick around. The real bonus here is that you can use this to heal yourself and your team together, or multiple team members caught up in damage. It may take some time to learn, but it is 100% your best option.
Holy Orb: A long range healing ability sending out an orb in a straight path from your character, it will splash healing in an AoE around the target hit, but because it hits the first person on your team, be careful not to waste it on someone else who might walk in its path. This ability gives you strong heals from a good distance, allowing you to keep safe whilst keeping your team healthy.
Desperate Prayer: A little different to most of the Group healing focused Holy Staffs, Desperate Prayer offers a strong single target heal that increases its heal value massively when your heal target is under 40% HP. Don’t worry however, you don’t have to hold onto it for when your team gets low, when cast on an ally over 40% HP it will heal them for a reasonable amount, whilst also boosting their healing received with a stacking bonus. This helps make your other heals far more effective.


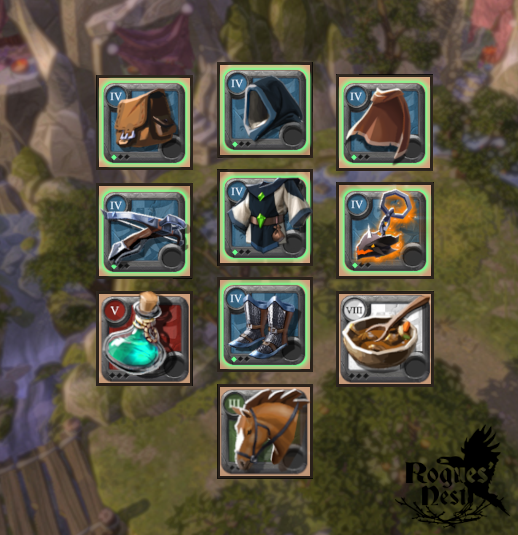
Equipment abilities
Scholar Cowl
This helmet choice will give you a good resistance boost vs melee damage, with a minor resistance boost vs magic damage. The main function of this helmet however is that any time you take damage, you will get energy restored. This means you get to turn being focused into regaining energy, whilst also mitigating some of the damage. A great pick for a healer likely to get focused.
Cleric Robe
This robe keeps you safe from damage with the immunity offered by its main ability “Everlasting Spirit”. Activating it will also mean that if you are hit in the next 1.5 seconds, you will become immune to all damage, and have your healing given boosted by 20%. Using this spell to protect yourself from a diving periods of focus, also offers you the ability to quickly restore yourself to higher health with the boosted healing picking you up quicker, whilst the robe protects you from all damage.
Royal Shoes
The Royal Shoes offer an incredibly defensive jump that lets you dive through the air avoiding all damage, debuffs and crowd control. These shoes offer you the best possible defense to dodge some severe damage when used at the right time. They also boast the longest invulnerability frame (i-frame) in the game, meaning your timing doesn't have to be perfect to avoid those big hits. That being said, timing is everything, and as you learn to use these shoes you will be able to really maximize the potential of such a strong, low cooldown evade.
Lymhurst Cape
Running out of energy as a healer means no healing, no healing means your team dies. The Lymhurst Cape is absolutely vital to provide a backup of energy during those times your team is taking heavy damage and you are using a lot of energy to keep them alive.
Mistcaller
A mistcaller is a great option to get your defenses up sooner by decreasing cooldowns. Because of the decreased cooldowns the mistcaller offers, this also means an increase in healing output, but at the cost of more energy, so be careful with spamming your heals. Use them when you need them, and if you are low on energy, try to encourage your team to play more defensively to allow you time to recover.
Passives
Adrenaline Driven Charity for the weapon, timing this well with your Holy Orb or Divine Intervention can lead to a big boost in healing output. For the Armor just take Aggression for the maximum possible healing, and on the shoes take balanced mind for a mix of increased healing and better defensives.
Avalonian pork Omelette
The Avalonian pork omelette offers a reduction in cooldowns, cast times, as well as an increase to your defense vs players statistic. In short this makes it a great option to have your spells available more often, reduce the cast times of your heals, and help you survive the damage the enemy team will throw at you.
Resistance Potion
The resistance potion can be a life saver as a healer. There may be times when aggressive melee heavy comps rush in for your backline, or when a tank manages to pull you out of position. Hopefully your team will peel for you to relieve that pressure, but there will be cases when that won’t happen as quickly as it needs you. The resistance potion should cover you from there. Alternatively, if the opposing team’s comp is more ranged focus, energy potions may be a necessary switch to ensure you have the energy you need to keep healing your team.
Strengths
- Highly customisable
- Great at preventing executes
- Relatively cheap
Counters
- Frequent interrupts such as Iron-Clad staffs
- Your team taking too much AOE damage